1 Project Introduction
This project is about building a system to translate a hand sketched human face into a 3D face model. The main problem about this system is Building a model to learn the outline pattern of human face and applying GAN to the generated face more real.
We have tried two methods in this project. One is a two step model, generating the RGB face and 3D face in two steps. The other is an End-to-End Pix2RGBD model, which tries to combine the two models together and generate 3D model directly from the hand skecthed image.
2 Two Step Model
The Two Step Model is a concatenation of two models. They are Pix2Pix Model and 3D Generation Model.
2.1 Pix2Pix Model Introduction
This model was published in [1], which aims to translate an image into another image. In this project, we take advantage of this model to translate our hand sketched human face into a colored RGB human face.
2.1.1 Network Structure and Loss Function
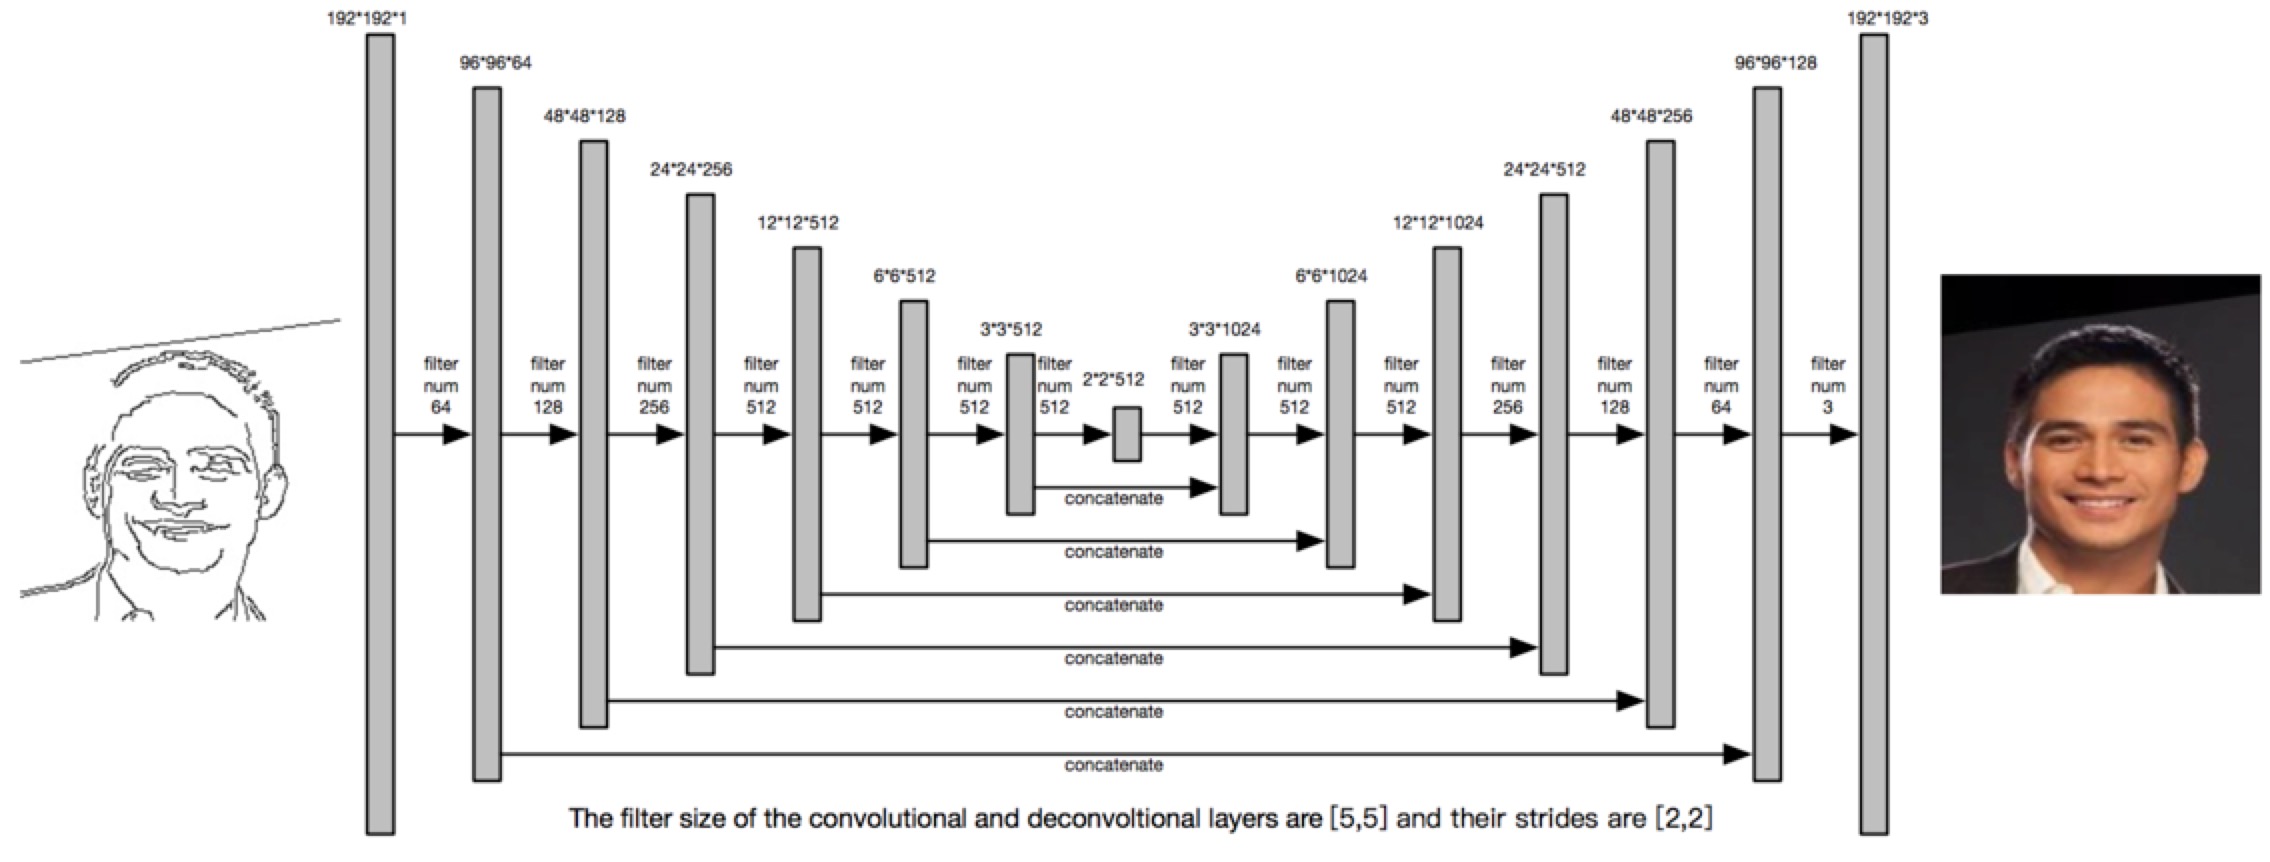
We apply a similar network structure descibled in [1], but we have changed some hyper parameters to make this model more suitable for our system. The GAN is applied in this model. The structure of generator part is shown below.

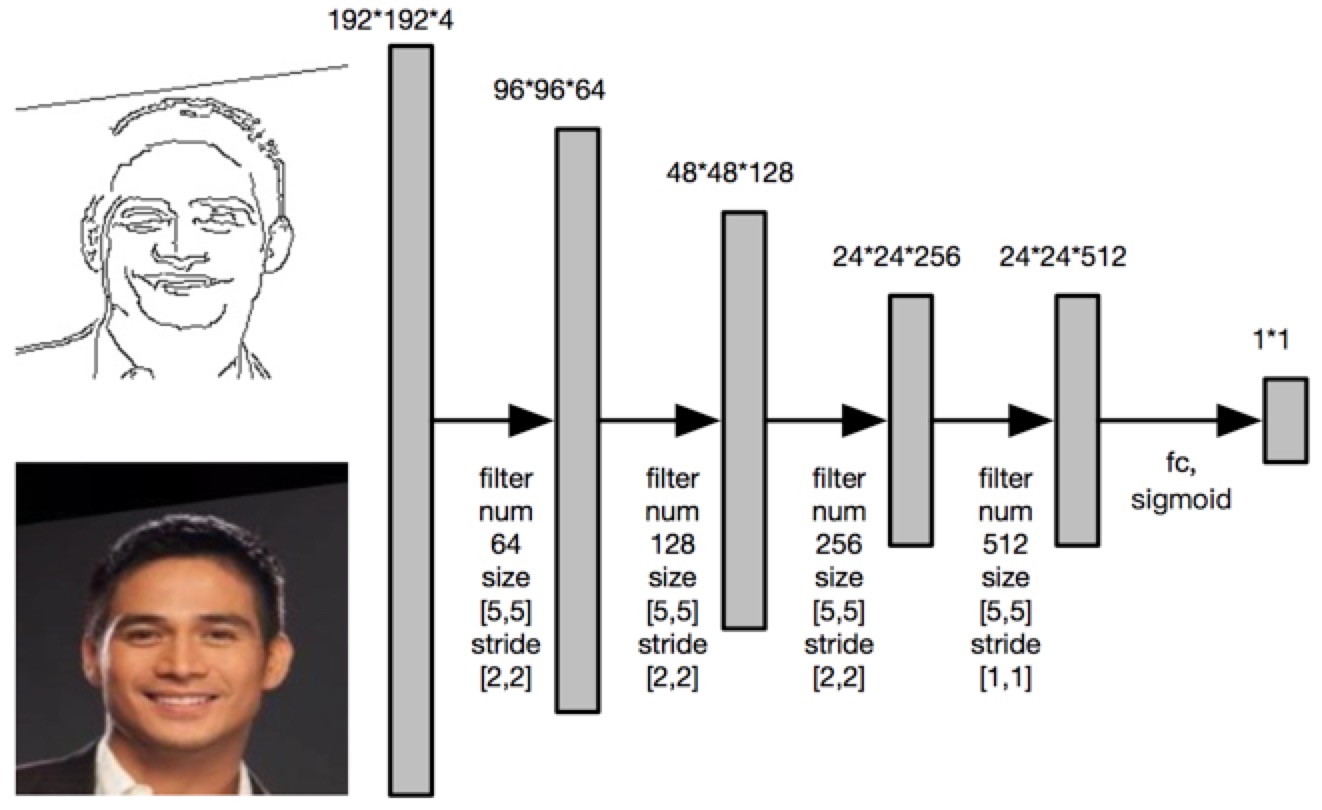
The input is an image with size 192*192, which only contains two kind of values (0, 255). The generator will generate a 192*192 colored image with three channels. The structure of the discriminator is shown below. The 192*192*4 input tensor is a concatenation of a hand skectched image and its corresponding RGB image. The discriminator will decide whether the RGB image is real or fake.

The loss function of our model is
$$L_{GAN}=\mathbb{E}_{y\sim p_{data}(y)}[\log D(y)]+\mathbb{E}_{x\sim p_{data}(x),z\sim p_{z}(z)}[1 - \log D(G(x))]\\
L= arg~\underset{G}{min}~\underset{D}{max}~L_{GAN} +\lambda \mathbb{E} \left \| y-G(x)) \right \|_1$$
x is the input hand sketched image; y is the ground truth; D and G are the generator and discriminator.
2.1.2 Training Data
In this project, we use the data from CelebA[3]. It contains 202,599 aligned face images. Since limited calculation resources, we only select the first 10,000 images. Buy applying the Canny and Sobel edge detection algorithm to generate the sketched images. So we can have a dataset with 20,000 pairs of training images. Here are some samples from our dataset.
| Image | Canny | Sobel | Image | Canny | Sobel |
|---|---|---|---|---|---|
 |
 |
 |
 |
 |
 |
 |
 |
 |
 |
 |
 |
 |
 |
 |
 |
 |
 |
2.1.3 Result
The table below illustrate some of the generated RGB face and it ground truth.
| Sketch | Ground Truth | Generated Face | Sketch | Ground Truth | Generated Face |
|---|---|---|---|---|---|
 |
 |
 |
 |
 |
 |
 |
 |
 |
 |
 |
 |
 |
 |
 |
 |
 |
 |
2.2 3D Generation Model
The 3D Generation Model aims to translate the colored face image into a 3D model. Here, we use the idea from [2]. In [2], the author rasied a Volume Regression Network (VRN) to generate a 192*192*200 volume to demonstrate the outline of a human face.
2.2.1 Loss Function
From the name of this network (Volume Regression Network), we can simply guess the loss function should be cross-entropy. The loss function of this network is
$$L=\sum_{w,h,d}[V_{whd}\log \widehat{V_{whd}}+(1-V_{whd})\log (1-\widehat{V_{whd}})]$$
Here $V_{whd}$ is the output of the VRN, $\widehat{V_{whd}}$ is the ground truth. We can find that the VRN is quite straightforward method to get the 3D mesh of a human face.
2.2.2 Volume Regression Network Structure
The VRN is much more complicated than the Pix2Pix model, so we can not draw all the details here. Similar to the Pix2Pix Network, the VRN also applies some skip architecture to maintain the information from previous layers. The VRN contains two hourglass network [5]. The image below illustrate the structure of the VRN.
The output of this network is a 192*192*200 tensor, which is extremely sparse and we only take advantages of the elements larger than 1. These elements form a outline of the human face. By setting this elements as the corresponding RGB value from the RGB image, we can visualize the final 3D model. This are some examples about the 3D model generated from the RGB images.
| Sketch | RGB Ground Truth | 3D Ground Truth | Generated RGB | Generated 3D |
|---|---|---|---|---|
 |
 |
 |
 |
 |
 |
 |
 |
 |
 |
 |
 |
 |
 |
 |
 |
 |
 |
 |
 |
 |
 |
 |
 |
 |
2.3 Workflow
The image below demonstrate the work flow of this method.
3 RGBD Model
In this project we also try another method to do an end-to-end training, which takes advantages of the Pix2Pix Network to get the final 3D model in one network.
3.1 Motivations
The output of the VRN is a 192*192*200 volume, which contains a great number of parameters. Just forcing the Pix2Pix Network to generate the 3D volume, we can not get a reasonable output.
By observing the 3D volume generated by VRN, we can find that a lot of elements are zero. To achieve a similar effect, we translate the 192*192*200 volume in to a 192*192 image with only one channel. We call it depth channel. Concatenate the depth channel with the RGB channel, we can generate a 192*192*4 RGBD image, which contains only a few parameters to learn.
3.2 Training Data
We apply the VRN on the images in our dataset and get 10,000 RGBD images. The table below displays some samples about the RGBD images. From the samples we can find that with only RGBD information, we can also revcover a reasonable human face, even though the 3D model might be a little weird.
| RGB | Depth | RGBD | RGB | Depth | RGBD |
|---|---|---|---|---|---|
 |
 |
 |
 |
 |
 |
 |
 |
 |
 |
 |
 |
 |
 |
 |
 |
 |
 |
3.3 Output sample and Analysis
We use a similar Pix2Pix Network structure here. The only difference is that the output is 192*192*4 with an extra channel denoting the depth. Here are some examples of the output.
| Sketch | RGB Ground Truth | RGBD Ground Truth | Generated RGB | Generated RGBD |
|---|---|---|---|---|
 |
 |
 |
 |
 |
 |
 |
 |
 |
 |
 |
 |
 |
 |
 |
 |
 |
 |
 |
 |
 |
 |
 |
 |
 |
Notice that this model can also output a reasonable result. In some cases, it can even outperform the two steps method, with much less calculation, since the VRN is an extremely large network with millions of parameters.
4. Implementation
In this part, we will talk about the implementation of this system. This system contains four parts. Web front end, Pix2Pix Server, VRN Server and Pix2RGBD Server. Since loading the model into memory takes a long time, we encapsulate the two models as two individual service and load the model into memory. Only do the inference when there is a request.
4.1 Framework
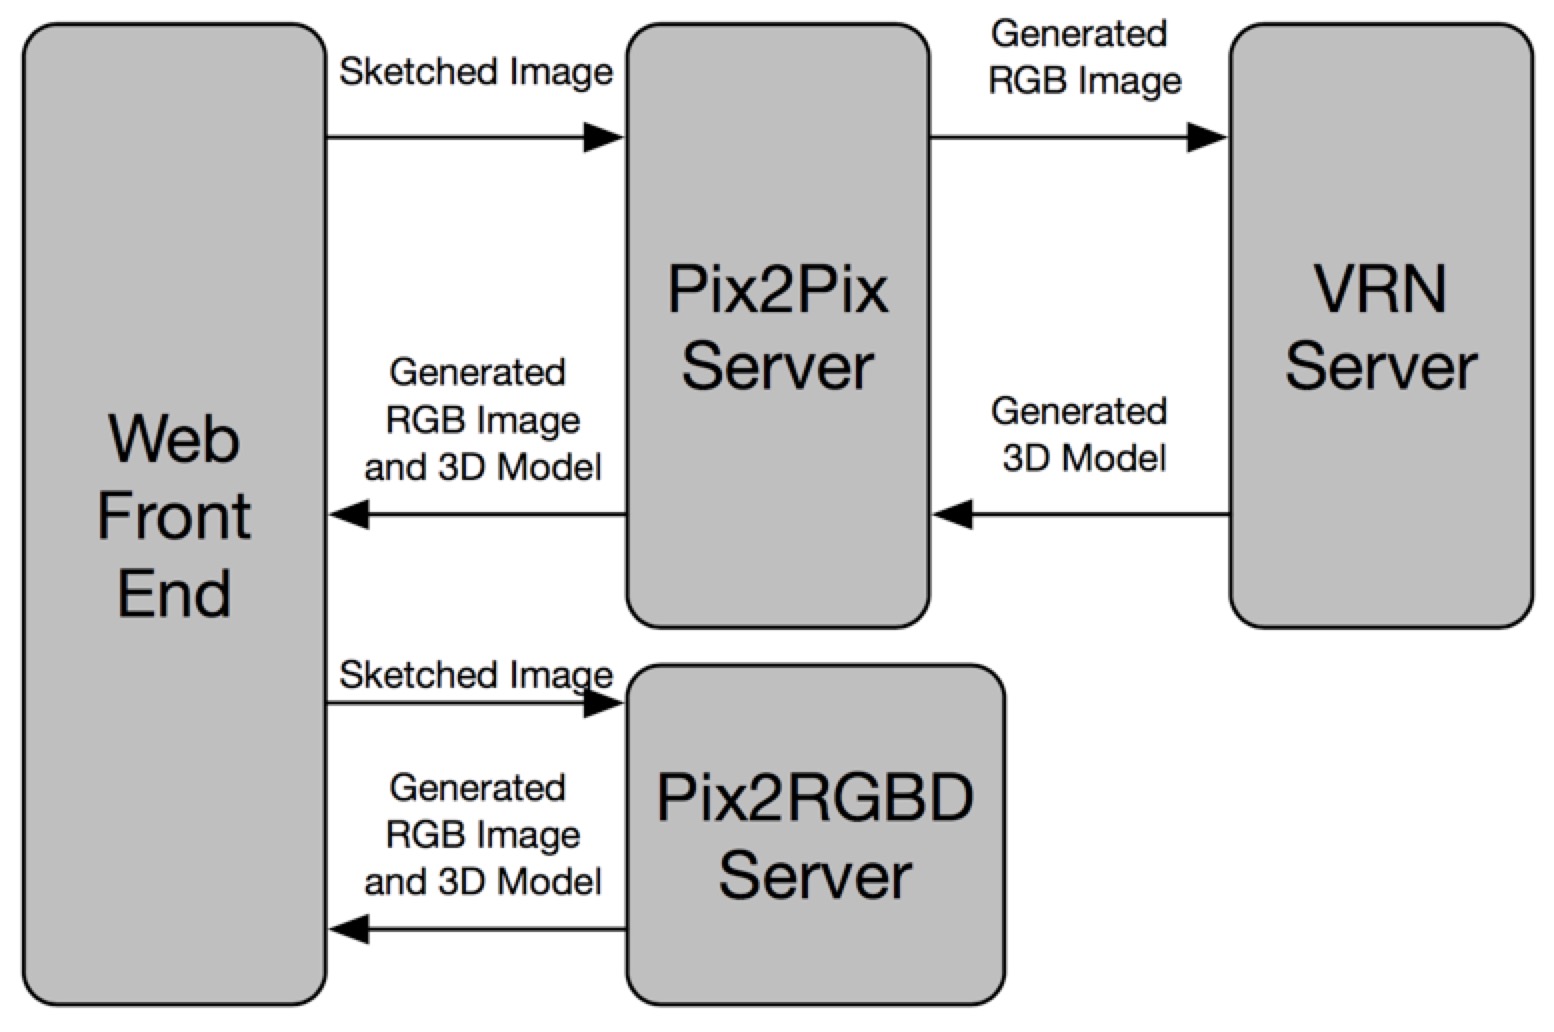
In this part, we will have a whole view about the implemention of this project. The image below illustrate the module decomposition. The message between different modules are implemented by socket.

4.2 Module Introductions
4.2.1 Web Front End
The web front end aims to handle the human interaction and display the RGB image and 3D model to the user. It will send the human sketched image to the Pix2Pix Sever and receive the generated RGB image and 3D model.
4.2.2 Pix2Pix Server
The Pix2Pix Server will translate the hand sketched image into a RGB image then it will send this image to the VRN Server and get the 3D model. Finally, it will send the generated RGB image and 3D model to the Web Front End.
4.2.3 VRN Server
The VRN Server aims to translate the RGB image, recevived from Pix2Pix Server, into a 3D model and send this 3D model to Pix2Pix Server.
4.2.3 Pix2RGBD Server
The Pix2RGBD Server aims to translate the hand sketched image, recevived Web Front End, into a 3D model directly and send this 3D model to the Web Front End.
5. Conclusion
In this project, we successfully build a system to translate the human skteched human face into a 3D model. We have tried two different approaches, one is a combination of Pix2Pix and VRN, the other one is an Pix2RGBD model. It turns out the Pix2RGBD model can also output a resenable result with less calculation. We have also developped a web demo for this project.
6. Reference
[1] Isola, Phillip, et al. “Image-to-image translation with conditional adversarial networks.” CVPR. 2017.
[2] Jackson, Aaron S., et al. “Large Pose 3D Face Reconstruction from a Single Image via Direct Volumetric CNN Regression.” ICCV. 2017.
[3] Liu, Ziwei, et al. “Deep learning face attributes in the wild.” ICCV. 2015.
[4] Zhu, Xiangyu, et al. “Face alignment across large poses: A 3d solution.” CVPR. 2016.
[5] Newell, Alejandro, et al. “Stacked hourglass networks for human pose estimation.” ECCV. 2016.